Latest: Download Free Desktop Wallpapers of Chef Loony! | Series: AuthorRank? | Download MBT eBooks!

How to add Contact form on Blogger - Change Style & Install it on Static Pages

1 comments

While going through various widgets on blogger dashboard i  came across a must use widget that everybody on the bloggersphere network should use on his/her blogsite, which is the contact form.


How to add Contact form on Blogger - Change Style & Install it on Static Pages
By Egbo Harold


The contact form for Blogger has the following features:
  • Field for the user name
  • Field for email
  • Submit Button
  • Field for the message (text-area)
Screenshot

contact form, blogger gadgets, static page
 The design is simple and the text colors inherit the section where you add it. At the moment, this widget has no configuration options and is not available for dynamic views.

How to Add Contact Form to Blogger

To add it to your blog, just select the Layout tab, then click on Add a gadget in the section you want to show, for example, if is in the sidebar you want to add the contact form. Then, select the More gadgets tab and add the Contact Form gadget.


blogger gadgets, blogger widgets, contact form

Styling Contact Form


As the background is transparent, the form will integrate well, but it's easy to modify using Style Sheets (CSS) to the appropriate selectors. Here's an example:

/* Contact Form Container */
.contact-form-widget {
width: 500px;
max-width: 100%;
margin: 0 auto;
padding: 10px;
background: #F8F8F8;
color: #000;
border: 1px solid #C1C1C1;
box-shadow: 0 1px 4px rgba(0, 0, 0, 0.25);
border-radius: 10px;
}

/* Fields and submit button */
.contact-form-name, .contact-form-email, .contact-form-email-message {
width: 100%;
max-width: 100%;
margin-bottom: 10px;
}

/* Submit button style */
.contact-form-button-submit {
border-color: #C1C1C1;
background: #E3E3E3;
color: #585858;
width: 20%;
max-width: 20%;
margin-bottom: 10px;
}

/* Submit button on mouseover */
.contact-form-button-submit:hover{
background: #4C8EF9;
color: #ffffff;
border: 1px solid #FAFAFA;
}

This is how it will look like after applying the style:
contact form, blogger gadgets, contact form for blogger

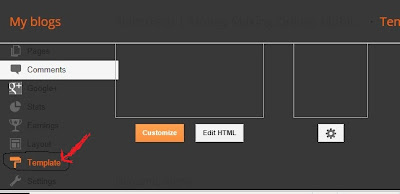
To add this style, go to Template > Edit HTML, click on the sideways arrow next to <b:skin>...</b:skin> and paste the code just above ]]></b:skin> (press CTRL + F to find it):


How To Add Contact Form In A Static Page


First step is to add the Contact Form gadget (Layout) and second, to edit the template (Template > Edit HTML) to remove most of the gadget. You have to search for the id "ContactForm", expand the widget by clicking on the black arrow on the left (same with the includable) and then delete the part that I have colored in red (see below):

Part to be removed:

  <b:widget id='ContactForm1' locked='false' title='Contact Form' type='ContactForm'>
    <b:includable id='main'>
  <b:if cond='data:title != &quot;&quot;'>
    <h2 class='title'><data:title/></h2>
  </b:if>
  <div class='contact-form-widget'>
    <div class='form'>
      <form name='contact-form'>
        <p/>
        <data:contactFormNameMsg/>
        <br/>
        <input class='contact-form-name' expr:id='data:widget.instanceId + &quot;_contact-form-name&quot;' name='name' size='30' type='text' value=''/>
        <p/>
        <data:contactFormEmailMsg/> <span style='font-weight: bolder;'>*</span>
        <br/>
        <input class='contact-form-email' expr:id='data:widget.instanceId + &quot;_contact-form-email&quot;' name='email' size='30' type='text' value=''/>
        <p/>
        <data:contactFormMessageMsg/> <span style='font-weight: bolder;'>*</span>
        <br/>
        <textarea class='contact-form-email-message' cols='25' expr:id='data:widget.instanceId + &quot;_contact-form-email-message&quot;' name='email-message' rows='5'/>
        <p/>
        <input class='contact-form-button contact-form-button-submit' expr:id='data:widget.instanceId + &quot;_contact-form-submit&quot;' expr:value='data:contactFormSendMsg' type='button'/>
        <p/>
        <div style='text-align: center; max-width: 222px; width: 100%'>
          <p class='contact-form-error-message' expr:id='data:widget.instanceId + &quot;_contact-form-error-message&quot;'/>
          <p class='contact-form-success-message' expr:id='data:widget.instanceId + &quot;_contact-form-success-message&quot;'/>
        </div>
      </form>
    </div>
  </div>
  <b:include name='quickedit'/>
</b:includable>
  </b:widget>

After you have saved the template, go to Pages and paste the following code into a new blank page with the title you want:

 <div class='widget ContactForm' id='ContactForm1'>
  <div class='contact-form-widget'>
    <div class='form'>
      <form name='contact-form'>
        <p>Name<p>
        <input class='contact-form-name' id='ContactForm1_contact-form-name' name='name' size='30' type='text' value=''/>
        <p>E-mail *</p>
        <input class='contact-form-email' id='ContactForm1_contact-form-email' name='email' size='30' type='text' value=''/>
        <p>Message *</p>
        <textarea class='contact-form-email-message' cols='25' id='ContactForm1_contact-form-email-message' name='email-message' rows='5'></textarea>
        <input class='contact-form-button contact-form-button-submit' id='ContactForm1_contact-form-submit' type='button' value='Submit'/>
        <p class='contact-form-error-message' id='ContactForm1_contact-form-error-message'></p>
        <p class='contact-form-success-message' id='ContactForm1_contact-form-success-message'></p>
      </form>
    </div>
  </div>
</div>

Messages will be sent to the same email that you have registered in Blogger.

Hope you enjoyed this tutorial? Please, use the share buttons and make sure you drop a comment below so i can know if my little tutorial helped or not.Thanks for stopping by!
Suni

How To Add Social Media Icons to Blogger Header

27 comments

I came up with this tutorial to help nairotech readers add various stylish social icons above their blogger headers just like ours, pictured below. This stylish widget will enable you add social media icons to your blog's header, icons like: Google+FacebookTwitterPinterest Icons to further beautiful the outlook of your blog and also help you gain more social media subscribers to your blog. Why i find this widget interesting is because it rotates immediately a mouse is been hovered on it. Guys, you need to check it out yourself enough of the long talking.


SEE THE SCREENSHOT:
Adding Social Media Icons to Blogger Header


Adding Social Media Icons to Blogger Header

Step One. Goto your Blogger dashboard, Select Template & just click on the Edit HTML button:

N/B: Backup Your Template


Adding Social Media Icons to Blogger Header
 

Step Two: Using CTRL + F, find  ]]></b:skin> tag  (screenshot two) & add the below code just above  ]]></b:skin> tag:


 /* Social icons for Blogger
----------------------------------------------- */

#social-icons {
margin-bottom:-30px;
height:50px;
width:100%;
display:block;
clear:both;
z-index: 2;
position: relative;
}
.social-media-icons {
display:table
}
.social-media-icons ul {
text-align:right;
padding:5px 5px 0 0
list-style-image:none;
list-style-position:outside;
list-style-type:none;
}
.social-media-icons ul {
margin-bottom:0;
padding:0;
float:right;
}
.social-media-icons li.media_icon {
margin-left:6px;
padding-left:0 !important;
background:none !important;
display:inline;
float:left;
}
.social-media-icons li:hover {
-moz-transform: rotate(360deg);
-webkit-transform: rotate(360deg);
-o-transform: rotate(360deg);
transform: rotate(-360deg);
-moz-transition: all 0.5s ease-in-out;
-webkit-transition: all 0.5s ease-in-out;
-o-transition: all 0.5s ease-in-out;
-ms-transition: all 0.5s ease-in-out;
transition: all 0.5s ease-in-out;
}


Screenshot Two:


Step Three: Now, search for the below line.


<b:section class='header' id='header' maxwidgets='1' showaddelement='no'>

Step 4. And  add this code just above it:


<div class='social-media-icons' id='social-icons'>
<ul>

<li class='media_icon'><a href='http://facebook.com/username'><img border='0' src='https://blogger.googleusercontent.com/img/b/R29vZ2xl/AVvXsEi9syCv66EDPtAOyYjyKXawdffpdl9V_bkmArASUKwmugwp-LQimZDj7JBtRjYjaIaciC6u-BXbcb3-MVpYw6FgrdNPHcrhvIGkuJLSXuwm8oUNdQikj79Pt_Dk8R16-UzQeABRPQ2S5dE/s1600/Facebook.png'/></a></li>

<li class='media_icon'><a href='http://twitter.com/#!/username'><img border='0' src='https://blogger.googleusercontent.com/img/b/R29vZ2xl/AVvXsEjXTsmUdEAyGAhruUi2YiZDsf3j6SmQtb00J2_LrDPFZPas12m2zlCMN3calLKwEevbotu8fl6gfziqNgoubJxsWKdHLx8WwixRSSvZtO5CglBMLoz_PGagQx9-pHMqPXhsCMyLiOQX6Xo/s1600/Twitter.png'/></a></li>

<li class='media_icon'><a href='https://plus.google.com/XXXXXXXXXXXXXXXXXX/about'><img border='0' src='https://blogger.googleusercontent.com/img/b/R29vZ2xl/AVvXsEgkEh3x8yWrr-wwuDGzgfYkW5ACXbllw52GUtJl4MI5MMIXlqXH1pZt7CHZAtFSNNGaCigp9JFMQzQ9KLAw65Vaez2d9ijUlD3ulazoJNDT30pl2unpeP3ureF372-ZTfcRhiEPzFDrqE0/s1600/googleplus.png'/></a></li>

<li class='media_icon'><a href='http://yourblogname.com/feeds/posts/default'><img border='0' src='https://blogger.googleusercontent.com/img/b/R29vZ2xl/AVvXsEhW7D_9-G7C_cxxWmOCYZk0tfl2we4fbtZacz1HtZ5j6rpItzKRPom46eB7pzfTem61nFyouMYmwVi4SNOzwViZCQGvdJfRfHh_X27xqKoNuFG0XsNpsyhLIt3cTMZao_iAQfmh5R0pVcU/s1600/RSS.png'/></a></li>

</ul></div>

Customization

- Change the red color with your usernames and id: the first is your Facebook username, the 2nd your Twitter, the 3rd you should change the XXXXX by your Google+ profile ID & while the fourth is the name of your blog.

- To change the icons, just replace the urls in blue with the ones of your images.
- You can add more icons if you want, you just have to add before </ul></div> a line like this for each extra icon you want:


<li class='media_icon'><a href='Link URL'><img border='0' src='Image URL'/></a></li>

Step 5. You can now Save your Template to apply changes watch your blog shine bright.

NOTE: This stylish effect will not function on Older browsers because is done with CSS3


ALSO READ:   How To Add Page Peel Effect To Blogger


I have done my part by taking out time to post this lovely tutorial, so is now your turn to ask questions, make contributions and share this update to your friends using the below share icons. I'm so eager to hear from you and i promise to reply just immediately you contribute or drop your comment.
Suni

How To Remove The Powered By Blogger Attribution From Your Blog

275 comments
 
The Footer Design series will cover all the latest and old redesigns that can be done on the blogger Footer of any blogger blog.
This post contains the first tutorials which shows you how to simply remove the Powered By Blogger attribution at the end of your blog (you'd have to scroll down to see it.)
The Attribution gadget is the gadget in the footer that contains the "Powered by Blogger" icon below every blogger blog - and of course, this tutorial will be centered on how we can remove it.
 On a normal ground, it’s impossible to remove the Attribution gadget that shows the “Powered by Blogger” because it’s locked into your blog’s template.
To remove it, you'd have to unlock it first before you may be able to remove it.

To remove it, you’d have to unlock it first before you may be able to remove it.
seo basics

Follow this simple tutorial below on how to easily remove the Attribution widget/Powered by Blogger from a blogger blog.

Firstly, login to your Dashboard; click on Template, then on Edit HTML


Secondly, click on the "Format Template" button (it’s has the same function just like the former “Expand widget box”)
blogger tips

Thirdly, click on the text area (shown above as the 1st stepto take above) and search for this code snippet below using CTRL F: 
<b:widget id='Attribution1' locked='true' title='' type='Attribution'>
 (Tip: press down CTRL and F at once on your keyboard to make the search box appear. Do this after clicking on the text area)
If you didn't see the code above in your blogger template, then search for Attribution1
website seo

I found my own code when I searched for Attribution1 only. The image below is showing me exactly where my own Attribution1is located. I marked it with an “X” as you can clearly see below (that’s exactly how your own would look like). 

guest blogging

Fourthly- Once you have found the code, proceed to replace or change the 'true' in  locked:‘true’ with false. This will be the new code after replacing the ‘true’ with ‘false’ -
From . . . 
  
<b:widget id='Attribution1' locked='true' title='' type='Attribution'>
To. . .
  
<b:widget id='Attribution1' locked='false' title='' type='Attribution'>

After doing that, you may now click on Save.
Basically, what we have just done is to free the widget from being locked; having done that, we can easily remove it from our blogger template widget.
Note: If the locked function in your attribution is like this as default -  

  
<b:widget id='Attribution1' locked='false' title='' type='Attribution'>

Just replace the red ‘false’ with ‘true’ and click on Save. After saving, search for the Attribution1again and change the ‘true’ back to ‘false’, then click onSave, it will surely work.
The Attribution gadget is now unlocked and can be easily removed at once.
To do that, head straight to Layout, scroll down, locate and Edit the Attribution Gadget.

blogging tips

Now, as you can see, there is a new button titled “Remove” (see picture below). Click on it to remove the Powered by Blogger attribution gadget. 

blogging tips
And that it!
Don't forget to subscribe t my tutorial and seo tips using the red gadget subscribe at the beginning of this blog.
In case you have any problem removing the attribution gadget carrying Powered by Blogger, please don't hesitate to tell me in the comment section below.
Thanks for reading, don't forget to share!
Suni

How to add border around posts in blogger by nairotech

0 comments
Adding borders around individual posts in your blog makes your blog look well arranged. It also makes your posts look better. Post borders can be easily added by editing blogger template. For adding post borders to your blog read our complete guide exclusively nairotech.com.. We just made the whole process easier and simpler


how to add border line around blog post
Nairotech.com

MUST READ:   How To Use Search Bar to Find a code in Blogger


Method:

1.Go to blogger dashboard.
2.Select template. Please, do Backup your template
3.Click edit HTML and click proceed.
4.Search for the following code.

.post {
margin: 0 0 45px 0;
}

5.Now replace the above code with following one.

.post {
margin:0 0 45px 0;
padding-top:10px;
padding-bottom:10px;
padding-right:10px;
padding-left:10px;
border: 1px solid #e9e9e9;
}

6.Save the template and you are done.


MUST READ:  How To Add Yahoo Smileys To Blogger Threaded Comments


Note:

The line  border: 1px solid #e9e9e9 ;  specifies border color and its width.You can modify it according to your own choice.
Suni

How To Add Yahoo Smileys To Blogger Threaded Comments

0 comments
Getting and posting a good blog post can be quite difficult but every determined Blogger will always succeed in concurring these two obstacles but, what lies now is getting people to comment on your post, oh yea that's where the real koko lies.  Most readers actually don't like commenting on blogs, especially if they found your blog so boring, but this hack aims to increase your chances of getting more comments on your blog, as readers will love to see the functionality of the smileys by commenting your blog which will definitely brings you more exposure.


This hack works with blogger threaded comment and on all blogger template. Now follow the simple steps below.


How to add yahoo smileys to blogger threaded comments


How To Add Yahoo Smileys To Blogger:


  • Go to your blogger dashboard
  • Click on Template > Edit HTML > Proceed (Mark/Tick Expand Widget Template)
  • Use crtl F to find ]]></b:skin> and paste the following code above it.

img.nairotech {
    height: auto !important;
    vertical-align: middle !important;
    width: auto !important;
    border:0px !important;
}

  • Search for </body> and paste the following code above </body>

<script src='http://rbcode.googlecode.com/files/yahoosmileys.js' type='text/javascript'/>

  • Now search for this line <div class='post-footer-line post-footer-line-3'> 
  • Find the next </b:includable> and paste the following code above </b:includable>

<b:if cond='data:blog.pageType == &quot;item&quot;'>
<div class='realcombiz' id='ysmile' style='
background: -moz-linear-gradient(top, #e4f5fc 0%, #bfe8f9 50%, #9fd8ef 51%, #2ab0ed 100%);background: -webkit-gradient(linear, left top, left bottom, color-stop(0%,#e4f5fc), color-stop(50%,#bfe8f9), color-stop(51%,#9fd8ef), color-stop(100%,#2ab0ed));background: -webkit-linear-gradient(top, #e4f5fc 0%,#bfe8f9 50%,#9fd8ef 51%,#2ab0ed 100%);background: -o-linear-gradient(top, #e4f5fc 0%,#bfe8f9 50%,#9fd8ef 51%,#2ab0ed 100%);background: -ms-linear-gradient(top, #e4f5fc 0%,#bfe8f9 50%,#9fd8ef 51%,#2ab0ed 100%);background: linear-gradient(top, #e4f5fc 0%,#bfe8f9 50%,#9fd8ef 51%,#2ab0ed 100%);border-radius: 3px;width:100%; padding:10px; height:65px;'>
<img alt='' class='bhacksmly' src='http://l.yimg.com/us.yimg.com/i/mesg/emoticons7/1.gif'/> :)
<img alt='' class='bhacksmly' src='http://l.yimg.com/us.yimg.com/i/mesg/emoticons7/2.gif'/> :(
<img alt='' class='bhacksmly' src='http://l.yimg.com/us.yimg.com/i/mesg/emoticons7/3.gif'/> ;)
<img alt='' class='bhacksmly' src='http://l.yimg.com/us.yimg.com/i/mesg/emoticons7/4.gif'/> :D
<img alt='' class='bhacksmly' src='http://l.yimg.com/us.yimg.com/i/mesg/emoticons7/7.gif'/> :-/
<img alt='' class='bhacksmly' src='http://l.yimg.com/us.yimg.com/i/mesg/emoticons7/8.gif'/> :x
<img alt='' class='bhacksmly' src='http://l.yimg.com/us.yimg.com/i/mesg/emoticons7/10.gif'/> :P
<img alt='' class='bhacksmly' src='http://l.yimg.com/us.yimg.com/i/mesg/emoticons7/11.gif'/> :-*
<img alt='' class='bhacksmly' src='http://l.yimg.com/us.yimg.com/i/mesg/emoticons7/12.gif'/> =((
<img alt='' class='bhacksmly' src='http://l.yimg.com/us.yimg.com/i/mesg/emoticons7/13.gif'/> :-O
<img alt='' class='bhacksmly' src='http://l.yimg.com/us.yimg.com/i/mesg/emoticons7/14.gif'/> X(
<img alt='' class='bhacksmly' src='http://l.yimg.com/us.yimg.com/i/mesg/emoticons7/15.gif'/> :7
<img alt='' class='bhacksmly' src='http://l.yimg.com/us.yimg.com/i/mesg/emoticons7/16.gif'/> B-)
<img alt='' class='bhacksmly' src='http://l.yimg.com/us.yimg.com/i/mesg/emoticons7/18.gif'/> #:-S
<img alt='' class='bhacksmly' src='http://l.yimg.com/us.yimg.com/i/mesg/emoticons7/20.gif'/> :((
<img alt='' class='bhacksmly' src='http://l.yimg.com/us.yimg.com/i/mesg/emoticons7/21.gif'/> :))
<img alt='' class='bhacksmly' src='http://l.yimg.com/us.yimg.com/i/mesg/emoticons7/24.gif'/> =))
<img alt='' class='bhacksmly' src='http://l.yimg.com/us.yimg.com/i/mesg/emoticons7/26.gif'/> :-B
<img alt='' class='bhacksmly' src='http://l.yimg.com/us.yimg.com/i/mesg/emoticons7/101.gif'/> :-c
<img alt='' class='bhacksmly' src='http://l.yimg.com/us.yimg.com/i/mesg/emoticons7/100.gif'/> :)]
<img alt='' class='bhacksmly' src='http://l.yimg.com/us.yimg.com/i/mesg/emoticons7/102.gif'/> ~X(
<img alt='' class='bhacksmly' src='http://l.yimg.com/us.yimg.com/i/mesg/emoticons7/103.gif'/> :-h
<img alt='' class='bhacksmly' src='http://l.yimg.com/us.yimg.com/i/mesg/emoticons7/28.gif'/> I-)
<img alt='' class='bhacksmly' src='http://l.yimg.com/us.yimg.com/i/mesg/emoticons7/41.gif'/> =D7
<img alt='' class='bhacksmly' src='http://l.yimg.com/us.yimg.com/i/mesg/emoticons7/43.gif'/> @-)
<img alt='' class='bhacksmly' src='http://l.yimg.com/us.yimg.com/i/mesg/emoticons7/45.gif'/> :-w
<img alt='' class='bhacksmly' src='http://l.yimg.com/us.yimg.com/i/mesg/emoticons7/47.gif'/> 7:P
<img alt='' class='bhacksmly' src='http://l.yimg.com/us.yimg.com/i/mesg/emoticons7/48.gif'/> 2):)
<img alt='' class='bhacksmly' src='http://l.yimg.com/us.yimg.com/i/mesg/emoticons7/110.gif'/> :!!
<img alt='' class='bhacksmly' src='http://l.yimg.com/us.yimg.com/i/mesg/emoticons7/111.gif'/> \m/
<img alt='' class='bhacksmly' src='http://l.yimg.com/us.yimg.com/i/mesg/emoticons7/112.gif'/> :-q
<img alt='' class='bhacksmly' src='http://l.yimg.com/us.yimg.com/i/mesg/emoticons7/113.gif'/> :-bd
<img alt='' class='bhacksmly' src='http://l.yimg.com/us.yimg.com/i/mesg/emoticons7/114.gif'/> ^#(^
</div><a href="http://nairotech.com"></a></b:if>
How To Add Yahoo Smileys To Blogger Threaded Comments


  • Save your template
Suni

What is blogger and how you can create a blogger blog?

0 comments

What is Blogger?

According to the Computer Desktop Encyclopedia, Blogger is:
"A Web site launched in 1999 from Pyra Labs, San Francisco, CA (www.blogger.com) that provides the tools for creating blogs (Weblogs). After users select a pre-designed template or create one with their look and feel, every posting entered on Blogger is published to the Blogger page on their Web site automatically. In early 2003, Blogger was acquired by Google. "


So, in simple terms, Blogger is a free site where you can make blogs (a kind of sites) where you can write about everything you want - from personal life to discussing about your political views, or relating your experience in a topic of interest.

How to create a blogger blog?

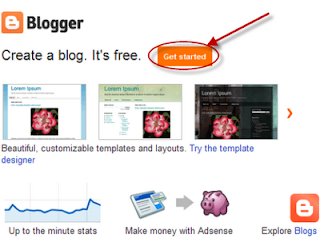
Go to Blogger.com homepage and click on the "Get Started" button

blogger tricks, tips, create a blog

Enter your Gmail acount details (your gmail address and pasword) and then press "Sign in"

blogger, create blog, web design

Enter the name you want to appear on your blog - check the "Agree to Terms and Conditions"
Click on the "New Blog" button

web hosting, forum, design, blogger blogspot

Enter your blog title and the address of your new blog, choose a template (Simple Template is more easily to customize, so i recommend you to choose this one) then click on "Create Blog!"

Your Blog has been created, you can start blogging.

Real Also:
Suni

How To Add 3D Rotating Menu In Blogger | Nairotech

2 comments

Nairotech Exclusively.. Today, we gon be dishing out a very lovely tutorial on Navigation (Horizontal) menu. After lots of discoveries we packaged this to suit every blogger template which doesn't need a Javascript or Javascript to function. It only needs Html and Css. You might also want to check our previous post on  How To Edit Your Blog Easily With The New Blogger Template Editor


                                          Steps To Add The Widget To Blogger 
  • Head to your Blogger dashboard
  • Template >> Click  Edit HTML
  • Then  find ]]></b:skin> &  paste the below code justbefore ]]></b:skin>

        /* 3d Flipping Menu By Nairotech.com */
        .block-menu {
            display: block;
            background: #000;
        }

        .block-menu li {
            display: inline-block;
        }

        .block-menu li a {
            color: #fff;
            display: block;
            text-decoration: none;
            font-family: 'Passion One',Arial,sans-serif;
            -webkit-font-smoothing: antialiased;
            -moz-font-smoothing: antialiased;
            font-smoothing: antialiased;
            text-transform: uppercase;
            overflow: visible;
            line-height: 20px;
            font-size: 24px;
            padding: 15px 10px;
        }

        /* animation domination */
        .three-d {
            -webkit-perspective: 200px;
            -moz-perspective: 200px;
            perspective: 200px;
            -webkit-transition: all .07s linear;
            -moz-transition: all .07s linear;
            transition: all .07s linear;
            position: relative;
        }

            .three-d:not(.active):hover {
                cursor: pointer;
            }

            .three-d:not(.active):hover .three-d-box,
            .three-d:not(.active):focus .three-d-box {
                -moz-transform: translateZ(-25px) rotateX(90deg);
                -webkit-transform: translateZ(-25px) rotateX(90deg);
                -o-transform: translateZ(-25px) rotateX(90deg);
                transform: translateZ(-25px) rotateX(90deg);
            }

        .three-d-box {
            -webkit-transition: all .5s ease-out;
            -moz-transition: all .5s ease-out;
            -ms-transition: all .5s ease-out;
            -o-transition: all .5s ease-out;
            transition: all .5s ease-out;
            -webkit-transform: translatez(-25px);
            -moz-transform: translatez(-25px);
            -o-transform: translatez(-25px);
            transform: translatez(-25px);
            -webkit-transform-style: preserve-3d;
            -moz-transform-style: preserve-3d;
            -ms-transform-style: preserve-3d;
            -o-transform-style: preserve-3d;
            transform-style: preserve-3d;
            pointer-events: none;
            position: absolute;
            top: 0;
            left: 0;
            display: block;
            width: 100%;
            height: 100%;
        }

        .front {
            -webkit-transform: rotatex(0deg) translatez(25px);
            -moz-transform: rotatex(0deg) translatez(25px);
            -o-transform: rotatex(0deg) translatez(25px);
            transform: rotatex(0deg) translatez(25px);
        }

        .back {
            -webkit-transform: rotatex(-90deg) translatez(25px);
            -moz-transform: rotatex(-90deg) translatez(25px);
            -o-transform: rotatex(-90deg) translatez(25px);
            transform: rotatex(-90deg) translatez(25px);
            color: #FFE7C4;
        }

        .front, .back {
            display: block;
            width: 100%;
            height: 100%;
            position: absolute;
            top: 0;
            left: 0;
            background: black;
            padding: 15px 10px;
            color: white;
            pointer-events: none;
            -moz-box-sizing: border-box;
            box-sizing: border-box;
        }

  • Save  Template

NOW,

  • Head straight to Layout in your Blogger Dashboard >> Select a Gadget (Blog  header section)
  • Then Select JavaScript/HTML  & paste the below code.

<ul class="block-menu">
<li><a href="#" class="three-d">
Home
<span class="three-d-box"><span class="front">Home</span><span class="back">Home</span></span>
</a></li>
<li><a href="#" class="three-d">
About<span class="three-d-box"><span class="front">About</span><span class="back">About</span></span>
</a></li>
<li><a href="#" class="three-d">
Services
<span class="three-d-box"><span class="front">Services</span><span class="back">Services</span></span>
</a></li>
<li><a href="#" class="three-d">
Blog
<span class="three-d-box"><span class="front">Blog</span><span class="back">Blog</span></span>
</a></li>
<li><a href="#" class="three-d">
Create this
<span class="three-d-box"><span class="front">Create this</span><span class="back">Create this</span></span>
</a></li>
</ul>

  • Change the highlighted section above
  • Save.

Like our Facebook Fanpage Here: http://www.facebook.com/nairotech
Enhanced by Zemanta
Suni

How To Edit Your Blog Easily With The New Blogger Template Editor

2 comments


The  Latest Blogger  Editor [Template] now have some changes that's quite easier  to use than it used to be.
The images below clearly shows  the template coding from the  numbered & colorful decorated lines displaying different coded snippets. The CSS, JavaScript, HTML -  b:if, include, and various displays.

blogger template, blogger tricks, blogger widgets

From now onwards, editting your template will be stressfree and easier to locate anything easily this    applies to CSS too, that appears in  differentiating rules & selectors.

One useful help with this new and advanced template are number which displays just in front of every of template code,  we'll be able to easily locate & change mistakes of different types.

How To Use The New Blogger Template HTML Editor

If you are about to search or locate  a tag just in your HTML Editor, just  click inside your Editor & tap the search key on your PC and then enter what you'll like to locate anything in your Template Editor.


Now,  just tap the enter on your PC & it should take you directly to the tag you requested.

Maybe, you may like to be redirected to the point of tag that is for a  widget,  you can just click  "JUMP TO WIDGET" bar of your template  editor and select the html's tag using the list & you will be redirected to that section of code.


You can see from below how the CSS is shown in a folded format


Just Another lovely function is the ability to "Preview Template" without leaving the template page & we can go back with ease to modify our template to our taste.
Lastly, Format template can help re-order the code.


With this little Tip, we can now easy use the Newly Advanced Blogger Template with ease and no qualms at all. You can also check out; How to apply Google+ commenting system to Our Blog.
Enjoy!
Suni

How To Apply Google Plus Commenting System On Your Blog

1 comments


Google+ just introduced a new commenting system which Google has introduced that integrates Google+ comments with Blogs. The new system of commenting is an added advantage to the default Blogger system of commenting, & it aids threaded comments too. It's appearance is better. Some of my friends requested via Mail that i post something on this system of commenting. I am putting up this compiled short post tutorial on how to easily install and use this new advanced commenting system.


                                  Moving to Google Plus comments:

To implement Google Plus comments for your Blog, first you have to connect your account to your Google+ account. Just follow these steps.


Login into your Blogger dashboard, and choose your blog you want to connect

Click on the Google+ button from the left sidebar of your Blog

Then, Click on the Get Started button on the top-left side to connect your blog account. This will not appear if your account is already merged.

Follow the simple instructions to connect your blog.

Once you are connected, you will get an option to Use Google+ comments on your blog.

Ticking this will enable the new Google Plus commenting system.

This will automatically change your Google Plus comments on for default templates.

But note it will likely not work for custom blogger templates. So, you will have to change your template code and change some lines as directed in the section below.

                   How To Display Google comments on Custom Blogger Templates

You can Revert to default option>>

Custom templates have configured customed widgets that usually override the default settings. And that is why this commenting system might not easily work with custom templates.

To achieve this, you can revert your Blog Widget to defaults in your template HTML editor via the following steps.


From inside your blog's dashboard, click on Template from the left sidebar.

Click on Edit HTML on your Blog

BackUp Your Template

Click on the Revert Widget templates to defaults button

It will reset other widgets to default as well.

Hope It Helps!
Suni

How to Backup/Restore Template in the new blogger interface | NairotechBlog

15 comments


I made several mistakes as a Newbie when i started blogging, one of them is not always backing my  Template before editting.. It really cost me a lot in the sense that i kept creating countless blogs which i later abandoned. These Trait is pretty common with the Newbies On Blogger.
 So, I'm glad to share this crucial topic on Nairotech ...  Blogger recently Upgraded to New Blogger Interface. Backup/Restore Of Template is very important for Old/New Bloggers.

I'll show how to achieve this with this easy steps...


Step To Backup Template In New Blogger Upgraded Interface:
   Step 1: Visit Your Blogger Account.  Choose Template as seen below..

How to Backup/Restore Template in the new blogger interface
  Click the Button Backup/Restore [Left Top] .


After You've Clicked Backup/Restore Button, A Box Will Appear As Shown Below..


Now, Click on Download Full Template to download Template.  You can now Save It.

You Can Click on  Browse to Restore the downloaded Template.
Alas! You Are Done...

Hope This Helps ? Please, don't forget to share this info to your Pals.. Enjoy!  

Suni

How To Add Page Peel Effect To Blogger | NairoTechBlog

3 comments


Page Peel Effect is a nice blogger widget used by professional Bloggers. The  Page Peel Widget is used to Display Ads, Page Peel has a tendency of catching the attention of Blog visitors on your blog and they will be made to click on your ad & your earnings may increase. Also, this widget can be used to boost your Blog/Web Subscribers. So, Let's Get To The Real Deal For The Day....


                   STEP BY STEP GUIDE:


Step 1; Add jQuery plugin  [ if your blog have a jquery plugin, please ignore this step]
  • Copy and Paste  the following code below  <head>

<script src='http://ajax.googleapis.com/ajax/libs/jquery/1.7.1/jquery.min.js' type='text/javascript'/>


Step 2 ;
  • Go to Design->Edit HTML
  • Copy and paste the below  Above </head>

<style type='text/css'>
img { behavior: url(iepngfix.htc) }
#pageflip {
position: absolute;
right: 0; top: 0;
float: right;
}
#pageflip img {
width: 50px; height: 52px;
z-index: 99;
position: absolute;
right: 0; top: 0;
-ms-interpolation-mode: bicubic;
}
#pageflip .back-img {
width: 50px; height: 50px;
overflow: hidden;
position: absolute;
right: 0; top: 0;z-index:98;
background: url(https://blogger.googleusercontent.com/img/b/R29vZ2xl/AVvXsEj3V0Y2URXSgk0a_y3WvsIMo4wWAQrJM9tZuu6k-cFQ9Rk5M4Xg5WgRSqRLAqwP6aknsfVGYLrrYjjOjLzOieYr2HcE0VqmmIOkzxWfht7XtJVNA7Ov4TFxoVMxlGbCFCof2D4V78pzvUs/s1600/rss+nairotech.blogspot.com+blog+page+peel.png) no-repeat right top #fff;
}
</style><a href='http://nairotech.blogspot.com'><img src='https://blogger.googleusercontent.com/img/b/R29vZ2xl/AVvXsEhjTVF4c_spo7lKWwIGb1AwGigajBA84S_ave2zgkjsujUFjQLdCtRAX5dkcJYi2qWouU_X_HZbD7FV6f7O_qNbO_Z_FOmBrFYHab2MHQrZ6n2AJldmqBO7rriJ5LSHSwxy9tnzymREkPM/s1600/1x1juice.png'/></a><script type='text/javascript'>
$(document).ready(function(){
//Page Flip on hover
$(&quot;#pageflip&quot;).hover(function() {
$(&quot;#pageflip img , .back-img&quot;).stop()
.animate({
width: &#39;307px&#39;,
height: &#39;319px&#39;
}, 500);
} , function() {
$(&quot;#pageflip img&quot;).stop()
.animate({
width: &#39;50px&#39;,
height: &#39;52px&#39;
}, 220);
$(&quot;.back-img&quot;).stop()
.animate({
width: &#39;50px&#39;,
height: &#39;50px&#39;
}, 200);
});
});
</script>


Step 3:
  • Copy the below code below <body>  


<div id='pageflip'>
<a href=' http://feeds.feedburner.com/Nairaharotech'><img alt='netoops blog' src='https://blogger.googleusercontent.com/img/b/R29vZ2xl/AVvXsEh5pPX8kA1yhMQYhdlmS13KyBEgYJ0s82XxK7bH7tsFrIu7HoxFmOQBZmUNXZgR1my2UqIYI70M3VRhyphenhyphenr2oOyaRMGZX6hyphenhyphenxYidPdlYRL39cjKAq5p2buH5NxGjqMdspOD2xhgwp732hnsPQ/s1600/page_flip.png'/></a>
<div class='back-img'/>
</div>

Replace the RED highlighted text with site image url or leave it as default
Replace the BLUE highlighted text with your feed URL Or Your Ad
  • Then, Save the Template.
Done!


Comment and Share If you have any queries.......
Suni

How To Place Rainbow Colors On Post Title LInk | NairotechBlog

0 comments


Today, i'll show you how to Make your blog to look more catchy & colourful by changing the color of the Links when Mouse hovers on it.


   To Achieve this, just follow the few steps;

  • Sign In to you Blogger Account.
  • Backup Your Blog
  • Go to "Design"> Edit HTML
  • Mark "Expand Widget Template"
  • Tap  Click ctrl F
  • Find <head> then type the code below immediately after <head>


<script type='text/javascript'>
//<![CDATA[
var rate = 20;
if (document.getElementById)
window.onerror=new Function("return true")
var objActive; // The object which event occured in
var act = 0; // Flag during the action
var elmH = 0; // Hue
var elmS = 128; // Saturation
var elmV = 255; // Value
var clrOrg; // A color before the change
var TimerID; // Timer ID
if (document.all) {
document.onmouseover = doRainbowAnchor;
document.onmouseout = stopRainbowAnchor;
}
else if (document.getElementById) {
document.captureEvents(Event.MOUSEOVER | Event.MOUSEOUT);
document.onmouseover = Mozilla_doRainbowAnchor;
document.onmouseout = Mozilla_stopRainbowAnchor;
}
function doRainbow(obj)
{
if (act == 0) {
act = 1;
if (obj)
objActive = obj;
else
objActive = event.srcElement;
clrOrg = objActive.style.color;
TimerID = setInterval("ChangeColor()",100);
}
}
function stopRainbow()
{
if (act) {
objActive.style.color = clrOrg;
clearInterval(TimerID);
act = 0;
}
}
function doRainbowAnchor()
{
if (act == 0) {
var obj = event.srcElement;
while (obj.tagName != 'A' && obj.tagName != 'BODY') {
obj = obj.parentElement;
if (obj.tagName == 'A' || obj.tagName == 'BODY')
break;
}
if (obj.tagName == 'A' && obj.href != '') {
objActive = obj;
act = 1;
clrOrg = objActive.style.color;
TimerID = setInterval("ChangeColor()",100);
}
}
}
function stopRainbowAnchor()
{
if (act) {
if (objActive.tagName == 'A') {
objActive.style.color = clrOrg;
clearInterval(TimerID);
act = 0;
}
}
}
function Mozilla_doRainbowAnchor(e)
{
if (act == 0) {
obj = e.target;
while (obj.nodeName != 'A' && obj.nodeName != 'BODY') {
obj = obj.parentNode;
if (obj.nodeName == 'A' || obj.nodeName == 'BODY')
break;
}
if (obj.nodeName == 'A' && obj.href != '') {
objActive = obj;
act = 1;
clrOrg = obj.style.color;
TimerID = setInterval("ChangeColor()",100);
}
}
}
function Mozilla_stopRainbowAnchor(e)
{
if (act) {
if (objActive.nodeName == 'A') {
objActive.style.color = clrOrg;
clearInterval(TimerID);
act = 0;
}
}
}
function ChangeColor()
{
objActive.style.color = makeColor();
}
function makeColor()
{
// Don't you think Color Gamut to look like Rainbow?
// HSVtoRGB
if (elmS == 0) {
elmR = elmV; elmG = elmV; elmB = elmV;
}
else {
t1 = elmV;
t2 = (255 - elmS) * elmV / 255;
t3 = elmH % 60;
t3 = (t1 - t2) * t3 / 60;
if (elmH < 60) {
elmR = t1; elmB = t2; elmG = t2 + t3;
}
else if (elmH < 120) {
elmG = t1; elmB = t2; elmR = t1 - t3;
}
else if (elmH < 180) {
elmG = t1; elmR = t2; elmB = t2 + t3;
}
else if (elmH < 240) {
elmB = t1; elmR = t2; elmG = t1 - t3;
}
else if (elmH < 300) {
elmB = t1; elmG = t2; elmR = t2 + t3;
}
else if (elmH < 360) {
elmR = t1; elmG = t2; elmB = t1 - t3;
}
else {
elmR = 0; elmG = 0; elmB = 0;
}
}
elmR = Math.floor(elmR).toString(16);
elmG = Math.floor(elmG).toString(16);
elmB = Math.floor(elmB).toString(16);
if (elmR.length == 1) elmR = "0" + elmR;
if (elmG.length == 1) elmG = "0" + elmG;
if (elmB.length == 1) elmB = "0" + elmB;
elmH = elmH + rate;
if (elmH >= 360)
elmH = 0;
return '#' + elmR + elmG + elmB;
}
//]]>
</script>

    Now, Save Your Template.....

    Hope This Helps!
    Suni
    • MBT Icons and buttons

      Icons and Buttons

      Our resources have been successfully downloaded over 10K times and found almost every where. Get yours!

    • choosing webhost for a blog

      Why HostGator?

      Learn Why we chose HostGator as our Web Host and find discount coupons to kick start your blog today!

    • SEO Settings for blogger

      ALL IN ONE SEO PACK 2012

      Learn every single SEO tip that will boost your blog's ranking and organic traffic. We got them all!

    • Blogger widgets and plugins

      Visit MBT's Blogger LAB

      Why not take a tour of all great Blogger widgets published so far? You Name it we have it!

    • become a six figure blogger!

      Become a SIX FIGURE BLOGGER

      Learn what it takes to become a successful entrepreneur and build a living online!